快速整合Elastic-Job
EJ(Elastic-Job,下文所有命名使用该简写)应用场景:
1、分布式环境中运行应用定时任务。
EJ是当当网开源的一个分布式任务调度的框架,该项目是基于Quartz、Zookeeper进行的二次开发。其最大的优点在于支持服务器的动态弹性扩容,并且保证同意作业分片同一时刻只在一个服务器节点上运行。
废话不多说:先上一张EJ整体架构图: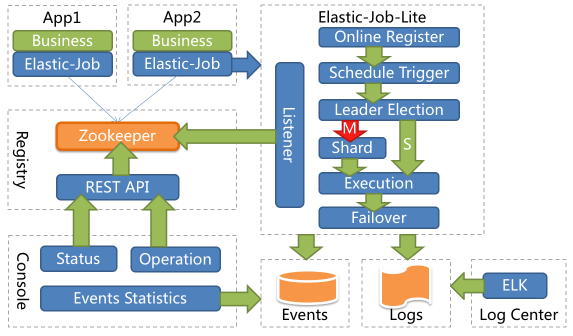
具体实现原理请参考官方文档:EJ官方文档
下面主要说下如何将EJ整合到项目中;官网提供了两种方式:SpringXML、Java配置;
整合前首先需要将EJ的maven依赖添加到项目pom文件中,如果不知道该选择什么版本,可到maven仓库中查看具体的可用版本:MVN仓库
这里需要以下依赖:1
2
3
4
5<dependency>
<groupId>com.dangdang</groupId>
<artifactId>elastic-job-lite-core</artifactId>
<version>2.1.5</version>
</dependency>
如果是spring项目的话,还需要添加:1
2
3
4
5<dependency>
<groupId>com.dangdang</groupId>
<artifactId>elastic-job-lite-spring</artifactId>
<version>2.1.5</version>
</dependency>
针对传统spring项目,如果使用传统的xml配置方式,EJ提供了特定的spring命名空间,可以方便的配置EJ相关配置比如:1
2
3
4
5
6
7
8
9
10
11
12
13
14
15
16
17
18<?xml version="1.0" encoding="UTF-8"?>
<beans xmlns="http://www.springframework.org/schema/beans"
xmlns:xsi="http://www.w3.org/2001/XMLSchema-instance"
xmlns:reg="http://www.dangdang.com/schema/ddframe/reg"
xmlns:job="http://www.dangdang.com/schema/ddframe/job"
xsi:schemaLocation="http://www.springframework.org/schema/beans
http://www.springframework.org/schema/beans/spring-beans.xsd
http://www.dangdang.com/schema/ddframe/reg
http://www.dangdang.com/schema/ddframe/reg/reg.xsd
http://www.dangdang.com/schema/ddframe/job
http://www.dangdang.com/schema/ddframe/job/job.xsd
">
<!--配置作业注册中心 -->
<reg:zookeeper id="regCenter" server-lists="yourhost:2181" namespace="dd-job" base-sleep-time-milliseconds="1000" max-sleep-time-milliseconds="3000" max-retries="3" />
<!-- 配置作业-->
<job:simple id="demoSimpleSpringJob" class="xxx.MyElasticJob" registry-center-ref="regCenter" cron="0/10 * * * * ?" sharding-total-count="3" sharding-item-parameters="0=A,1=B,2=C" />
</beans>
配置成功后,项目在启动时会自动创建对应的Bean到spring容器中。
如果使用Java显示指定配置时,首先需要在properties或yml文件中指定zk的服务器地址与节点命名空间:1
2zk.elastic.job.server-lists=ip:端口
zk.elastic.job.namespace=skyli
然后显示配置zk注册中心的bean:1
2
3
4
5
6
7
8
9
10
11
12
13
14
15@Configuration
@ConfigurationProperties(prefix = "zk.elastic.job")
public class ZkRegConfig {
private String serverlists;
private String namespace;
@Bean
public ZookeeperConfiguration zookeeperConfiguration() {
return new ZookeeperConfiguration(serverlists, namespace);
}
@Bean(initMethod = "init")
public ZookeeperRegistryCenter zookeeperRegistryCenter(ZookeeperConfiguration zookeeperConfiguration) {
return new ZookeeperRegistryCenter(zookeeperConfiguration);
}
其中@Bean(initMethod = “init”)注解将在bean初始化时调用init方法去连接zk;
接下来需要针对分布式作业进行配置,EJ有三种类型的Job:
- SimpleJob
- DataflowJob
- ScriptJob
每种类型的Job有什么功能与区别请参考官方文档。
这里主要讲一下SimpleJob的配置方法,其他类型的配置也是大同小异:
EJ针对作业有三种配置:
- JobCoreConfiguration
- JobTypeConfiguration
- JobRootConfiguration
每种配置相互依赖,最终确定一个作业的配置,举个获取作业配的栗子:1
2
3
4
5
6
7private LiteJobConfiguration getLiteJobConfiguration(final Class<? extends SimpleJob> jobClass, final String cron, final int shardingTotalCount, String shardingParamters) {
return LiteJobConfiguration.newBuilder(
new SimpleJobConfiguration(JobCoreConfiguration.newBuilder(jobClass.getName()
, cron, shardingTotalCount).shardingItemParameters(shardingParamters).build()
, jobClass.getCanonicalName()))
.overwrite(true).build();
}
其中该方法的第一个形参为要执行任务的class对象:1
2
3
4
5
6
7
8
9
10@Component
public class MyThreeTask implements SimpleJob {
@Override
public void execute(ShardingContext sc) {
System.out.println(String.format("任务名称:%s\n 分片项%s\n 分片总数%s\n 分片参数%s\n"
, sc.getJobName()
, sc.getShardingItem()
, sc.getShardingTotalCount()
, sc.getShardingParameter()));
}
后边的参数为特定Job的配置:包括cron表达式、分片参数、分片总数等配置,将每种配置定义在properties或yml中(栗子):1
2
3
4
5elastic.job.serverlists=localhost:2181
elastic.job.namespace=skyli
elastic.job.scheduleCron=0/5 * * * * ?
elastic.job.shardingTotalCount=3
elastic.job.sharding-parameters=0=A,1=B
针对特定作业的配置请参考官方文档中的配置详解,其详细说明了每种配置的功能。
紧接着初始化JobScheduler:1
2
3
4
5
6
7@Resource
private SimpleJob myThreeTask;
@Bean(initMethod = "init")
public JobScheduler myThreeJobScheduler() {
return new SpringJobScheduler(myThreeTask, zookeeperRegistryCenter, getLiteJobConfiguration(myThreeTask.getClass(), scheduleCron, shardingTotalCount, null));
}
这样一个可以在分布式环境中运行的Job便定义好了,spring项目在多个服务器中运行时,该Job便能根据分片策略将不同的分片分派到指定服务器运行了,看下运行结果(两台服务器):
服务器1: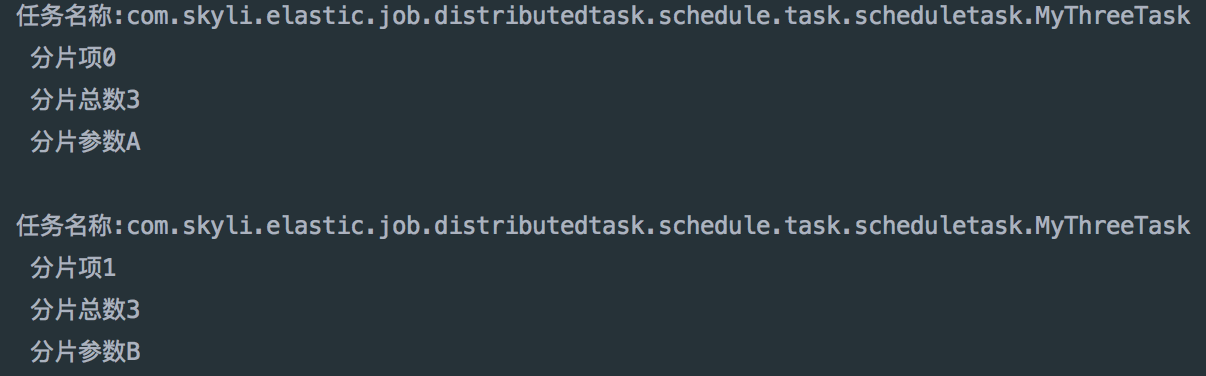
服务器2:
不知大家有没有发现有什么不妥的地方? 定义一个简单的分布式作业需要配置大量的代码,无论你采用什么方式(xml或者java显示配置)。
那么在SpringBoot盛行的今天,快速敏捷开发成了主流趋势,我们需要尽量少的配置便可以将EJ整合到项目中,而EJ官方并没有针对SpringBoot项目提供官方的starter依赖。基于此需求也方便司内同事可以快速使用EJ,本人封装了一套EJ的starter依赖,目前只是针对SimpleJob类型的作业提供支持。该starter目前处于公司司内部项目使用阶段,后期会公布在本人的GitHub上。
下面简单介绍改starter依赖的使用方法:
首先需要在pom文件中引用该starter(目前该项目只发布在公司内部Maven仓库中,外部不可用):1
2
3
4
5<dependency>
<groupId>com.vpgame.infra</groupId>
<artifactId>dd-elastic-job-spring-boot-starter</artifactId>
<version>0.0.1-SNAPSHOT</version>
</dependency>
然后需要在spring application.properties或者yml文件中添加zk配置:1
2zk.elastic.job.server-lists=ip:port
zk.elastic.job.namespace=your namespace
紧接着只需要在定义Job是在类声明时添加@JobConf注解便能完成分布式Job的定义:1
2
3
4
5
6
7
8
9
10
11
12
13
14
15@Component
@JobConf(name = "mySimpleTask"
, cron = "0/5 * * * * ?"
, shardingTotalCount = 3
, shardingParameters = "0=A,1=B")
public class MyThreeTask implements SimpleJob {
@Override
public void execute(ShardingContext sc) {
System.out.println(String.format("任务名称:%s\n 分片项%s\n 分片总数%s\n 分片参数%s\n"
, sc.getJobName()
, sc.getShardingItem()
, sc.getShardingTotalCount()
, sc.getShardingParameter()));
}
}
分别将项目在不同服务器上启动,便可以看到定义的作业在不同机器上运行的情况(运行结果与上述单独配置运行结果相同):
服务器1:
服务器2:
OK,如何将EJ整合到项目中就说到这里吧!^_^